一,回顾
上文介绍了Server的启动过程,但是没有详细介绍Container和Connector的详细启动流程,下面我将介绍Container的启动流程。
二,Container的init
下面我看看Container的继承结构: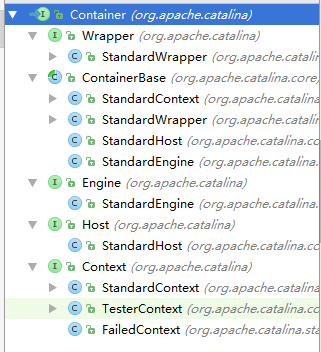
Engine,Host,Context,Wrapper都属于Container。下面,我们根据server.xml的默认配置结构来看看。
<Engine name="Catalina" defaultHost="localhost">
<!--
<Cluster className="org.apache.catalina.ha.tcp.SimpleTcpCluster"/>
-->
//LockOutRealm防止暴力破解
<Realm className="org.apache.catalina.realm.LockOutRealm">
<Realm className="org.apache.catalina.realm.UserDatabaseRealm"
resourceName="UserDatabase"/>
</Realm>
<Host name="localhost" appBase="webapps"
unpackWARs="true" autoDeploy="true">
<Valve className="org.apache.catalina.valves.AccessLogValve" directory="logs"
prefix="localhost_access_log" suffix=".txt"
pattern="%h %l %u %t "%r" %s %b" />
</Host>
</Engine>
其中有Realm,这个是TOMCAT的安全域,我们暂时不关心,看其他的几个。
2.1 Engine的initInternal
 protected void initInternal() throws LifecycleException {
    //获取一个默认的安全域
    getRealm();
    super.initInternal();
}
方法比较简单,我们关注super.initInternal()方法:
2.2 ContainerBase的initInternal
ContainerBase主要是创建一个startStopExecutor线程池用来启动停止子节点。
ContainerBase
protected void initInternal() throws LifecycleException {
    BlockingQueue<Runnable> startStopQueue = new LinkedBlockingQueue<>();
    //创建线程池
    startStopExecutor = new ThreadPoolExecutor(
            getStartStopThreadsInternal(),
            getStartStopThreadsInternal(), 10, TimeUnit.SECONDS,
            startStopQueue,
            new StartStopThreadFactory(getName() + "-startStop-"));
    startStopExecutor.allowCoreThreadTimeOut(true);
    super.initInternal();
}
2.3 StandardHost的initInternal
protected synchronized void startInternal() throws LifecycleException {
    //设置异常处理valve
    String errorValve = getErrorReportValveClass();
    super.startInternal();
}
2.4 StandardContext的initInternal
protected void initInternal() throws LifecycleException {
    super.initInternal();

    //注册命名服务
    if (namingResources != null) {
        namingResources.init();
    }
    //启动
    if (resources != null) {
        resources.start();
    }

    // Send j2ee.object.created notification
    if (this.getObjectName() != null) {
        Notification notification = new Notification("j2ee.object.created",
                this.getObjectName(), sequenceNumber.getAndIncrement());
        broadcaster.sendNotification(notification);
    }
}
2.5 StandardWrapper的initInternal
StandardWrapper的initInternal继承的父类ContainerBase的initInternal。
这样,初始化工作就告一段落了,下面,我们看start方法。
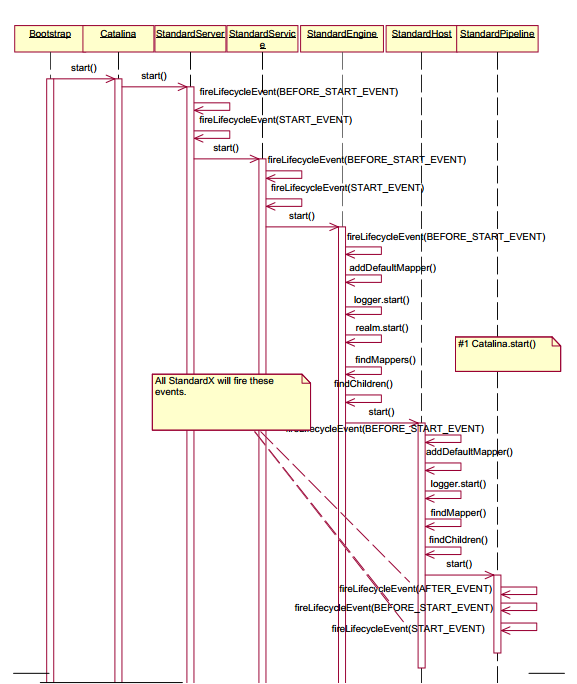
三,Container的start
上文中我们知道,Container的start最终会调用自己的startInternal方法,下面我们看具体实现。
3.1 StandardEngine的startInternal
StandardEngine
protected synchronized void startInternal() throws LifecycleException {
    super.startInternal();
}
StandardEngine调用了父类ContainerBase的startInternal方法。
3.2 ContainerBase的startInternal
ContainerBase
protected synchronized void startInternal() throws LifecycleException {
    logger = null;
    getLogger();
    //获取并启动集群
    Cluster cluster = getClusterInternal();
    if (cluster instanceof Lifecycle) {
        ((Lifecycle) cluster).start();
    }
    //获取并启动安全域
    Realm realm = getRealmInternal();
    if (realm instanceof Lifecycle) {
        ((Lifecycle) realm).start();
    }

    //使用线程池启动子容器
    Container children[] = findChildren();
    List<Future<Void>> results = new ArrayList<>();
    for (int i = 0; i < children.length; i++) {
        results.add(startStopExecutor.submit(new StartChild(children[i])));
    }
    //异步获取启动结果
    boolean fail = false;
    for (Future<Void> result : results) {
        try {
            result.get();
        } catch (Exception e) {
            log.error(sm.getString("containerBase.threadedStartFailed"), e);
            fail = true;
        }

    }
    if (fail) {
        throw new LifecycleException(
                sm.getString("containerBase.threadedStartFailed"));
    }

    // 启动pipeline中的Valves
    if (pipeline instanceof Lifecycle)
        ((Lifecycle) pipeline).start();

    setState(LifecycleState.STARTING);

    //启动后台线程,定期检查session超时
    threadStart();
}
就这样,ContainerBase会将它的子容器用线程池启动起来。
3.3 StandardHost的startInternal
StandardHost
protected synchronized void startInternal() throws LifecycleException {
    String errorValve = getErrorReportValveClass();
    super.startInternal();
}
啥也没做,继续调用父类的startInternal方法。
3.4 StandardContext的startInternal
StandardContext
protected synchronized void startInternal() throws LifecycleException {
    // Send j2ee.state.starting notification
    if (this.getObjectName() != null) {
        Notification notification = new Notification("j2ee.state.starting",
                this.getObjectName(), sequenceNumber.getAndIncrement());
        broadcaster.sendNotification(notification);
    }

    setConfigured(false);
    boolean ok = true;

    // Currently this is effectively a NO-OP but needs to be called to
    // ensure the NamingResources follows the correct lifecycle
    if (namingResources != null) {
        namingResources.start();
    }

    // Add missing components as necessary
    if (getResources() == null) {   // (1) Required by Loader
        if (log.isDebugEnabled())
            log.debug("Configuring default Resources");

        try {
            setResources(new StandardRoot(this));
        } catch (IllegalArgumentException e) {
            log.error(sm.getString("standardContext.resourcesInit"), e);
            ok = false;
        }
    }
    if (ok) {
        resourcesStart();
    }

    if (getLoader() == null) {
        WebappLoader webappLoader = new WebappLoader(getParentClassLoader());
        webappLoader.setDelegate(getDelegate());
        setLoader(webappLoader);
    }

    // Initialize character set mapper
    getCharsetMapper();

    // Post work directory
    postWorkDirectory();

    // Validate required extensions
    boolean dependencyCheck = true;
    try {
        dependencyCheck = ExtensionValidator.validateApplication
            (getResources(), this);
    } catch (IOException ioe) {
        log.error(sm.getString("standardContext.extensionValidationError"), ioe);
        dependencyCheck = false;
    }

    if (!dependencyCheck) {
        // do not make application available if depency check fails
        ok = false;
    }

    // Reading the "catalina.useNaming" environment variable
    String useNamingProperty = System.getProperty("catalina.useNaming");
    if ((useNamingProperty != null)
        && (useNamingProperty.equals("false"))) {
        useNaming = false;
    }

    if (ok && isUseNaming()) {
        if (getNamingContextListener() == null) {
            NamingContextListener ncl = new NamingContextListener();
            ncl.setName(getNamingContextName());
            ncl.setExceptionOnFailedWrite(getJndiExceptionOnFailedWrite());
            addLifecycleListener(ncl);
            setNamingContextListener(ncl);
        }
    }

    // Standard container startup
    if (log.isDebugEnabled())
        log.debug("Processing standard container startup");


    // Binding thread
    ClassLoader oldCCL = bindThread();

    try {
        if (ok) {
            // Start our subordinate components, if any
            Loader loader = getLoader();
            if (loader instanceof Lifecycle) {
                ((Lifecycle) loader).start();
            }

            // since the loader just started, the webapp classloader is now
            // created.
            setClassLoaderProperty("clearReferencesStatic",
                    getClearReferencesStatic());
            setClassLoaderProperty("clearReferencesStopThreads",
                    getClearReferencesStopThreads());
            setClassLoaderProperty("clearReferencesStopTimerThreads",
                    getClearReferencesStopTimerThreads());
            setClassLoaderProperty("clearReferencesHttpClientKeepAliveThread",
                    getClearReferencesHttpClientKeepAliveThread());

            // By calling unbindThread and bindThread in a row, we setup the
            // current Thread CCL to be the webapp classloader
            unbindThread(oldCCL);
            oldCCL = bindThread();

            // Initialize logger again. Other components might have used it
            // too early, so it should be reset.
            logger = null;
            getLogger();

            Cluster cluster = getClusterInternal();
            if (cluster instanceof Lifecycle) {
                ((Lifecycle) cluster).start();
            }
            Realm realm = getRealmInternal();
            if (realm instanceof Lifecycle) {
                ((Lifecycle) realm).start();
            }

            // Notify our interested LifecycleListeners
            fireLifecycleEvent(Lifecycle.CONFIGURE_START_EVENT, null);

            // Start our child containers, if not already started
            for (Container child : findChildren()) {
                if (!child.getState().isAvailable()) {
                    child.start();
                }
            }

            // Start the Valves in our pipeline (including the basic),
            // if any
            if (pipeline instanceof Lifecycle) {
                ((Lifecycle) pipeline).start();
            }

            // Acquire clustered manager
            Manager contextManager = null;
            Manager manager = getManager();
            if (manager == null) {
                if (log.isDebugEnabled()) {
                    log.debug(sm.getString("standardContext.cluster.noManager",
                            Boolean.valueOf((getCluster() != null)),
                            Boolean.valueOf(distributable)));
                }
                if ( (getCluster() != null) && distributable) {
                    try {
                        contextManager = getCluster().createManager(getName());
                    } catch (Exception ex) {
                        log.error("standardContext.clusterFail", ex);
                        ok = false;
                    }
                } else {
                    contextManager = new StandardManager();
                }
            }

            // Configure default manager if none was specified
            if (contextManager != null) {
                if (log.isDebugEnabled()) {
                    log.debug(sm.getString("standardContext.manager",
                            contextManager.getClass().getName()));
                }
                setManager(contextManager);
            }

            if (manager!=null && (getCluster() != null) && distributable) {
                //let the cluster know that there is a context that is distributable
                //and that it has its own manager
                getCluster().registerManager(manager);
            }
        }

        if (!getConfigured()) {
            log.error(sm.getString("standardContext.configurationFail"));
            ok = false;
        }

        // We put the resources into the servlet context
        if (ok)
            getServletContext().setAttribute
                (Globals.RESOURCES_ATTR, getResources());

        if (ok ) {
            if (getInstanceManager() == null) {
                javax.naming.Context context = null;
                if (isUseNaming() && getNamingContextListener() != null) {
                    context = getNamingContextListener().getEnvContext();
                }
                Map<String, Map<String, String>> injectionMap = buildInjectionMap(
                        getIgnoreAnnotations() ? new NamingResourcesImpl(): getNamingResources());
                setInstanceManager(new DefaultInstanceManager(context,
                        injectionMap, this, this.getClass().getClassLoader()));
                getServletContext().setAttribute(
                        InstanceManager.class.getName(), getInstanceManager());
            }
        }

        // Create context attributes that will be required
        if (ok) {
            getServletContext().setAttribute(
                    JarScanner.class.getName(), getJarScanner());
        }

        // Set up the context init params
        mergeParameters();

        // Call ServletContainerInitializers
        for (Map.Entry<ServletContainerInitializer, Set<Class<?>>> entry :
            initializers.entrySet()) {
            try {
                entry.getKey().onStartup(entry.getValue(),
                        getServletContext());
            } catch (ServletException e) {
                log.error(sm.getString("standardContext.sciFail"), e);
                ok = false;
                break;
            }
        }

        // Configure and call application event listeners
        if (ok) {
            if (!listenerStart()) {
                log.error(sm.getString("standardContext.listenerFail"));
                ok = false;
            }
        }

        // Check constraints for uncovered HTTP methods
        // Needs to be after SCIs and listeners as they may programatically
        // change constraints
        if (ok) {
            checkConstraintsForUncoveredMethods(findConstraints());
        }

        try {
            // Start manager
            Manager manager = getManager();
            if (manager instanceof Lifecycle) {
                ((Lifecycle) manager).start();
            }
        } catch(Exception e) {
            log.error(sm.getString("standardContext.managerFail"), e);
            ok = false;
        }

        // Configure and call application filters
        if (ok) {
            if (!filterStart()) {
                log.error(sm.getString("standardContext.filterFail"));
                ok = false;
            }
        }

        // Load and initialize all "load on startup" servlets
        if (ok) {
            if (!loadOnStartup(findChildren())){
                log.error(sm.getString("standardContext.servletFail"));
                ok = false;
            }
        }

        // Start ContainerBackgroundProcessor thread
        super.threadStart();
    } finally {
        // Unbinding thread
        unbindThread(oldCCL);
    }

    // Set available status depending upon startup success
    if (ok) {
        if (log.isDebugEnabled())
            log.debug("Starting completed");
    } else {
        log.error(sm.getString("standardContext.startFailed", getName()));
    }

    startTime=System.currentTimeMillis();

    // Send j2ee.state.running notification
    if (ok && (this.getObjectName() != null)) {
        Notification notification =
            new Notification("j2ee.state.running", this.getObjectName(),
                             sequenceNumber.getAndIncrement());
        broadcaster.sendNotification(notification);
    }

    // The WebResources implementation caches references to JAR files. On
    // some platforms these references may lock the JAR files. Since web
    // application start is likely to have read from lots of JARs, trigger
    // a clean-up now.
    getResources().gc();

    // Reinitializing if something went wrong
    if (!ok) {
        setState(LifecycleState.FAILED);
    } else {
        setState(LifecycleState.STARTING);
    }
}
上面代码有点长,主要是做了资源的设置,类加载器的设置,session管理的设置等。当然也启动了pipeline。但是有一点我们需要注意的是,子容器并不是在pipeline的StandardContextValve中传递执行的。那么是在哪里呢?其实就在StandardContext中的startInternal执行的。为什么要这样设计呢?我们发现,这是由于servlet在xml中的顺序决定了启动顺序。
接下来有人会不会有另一个疑惑,要是我在server.xml没有配置context,只是放在了webapps目录下面,那么这个context是如何加载的呢?接下来,我就讲讲这个。
四,Context调用时机
context可以有2种表现形式,一种是直接写在server.xml文件中,另一种是放在tomcat的webapps目录下。
第一种形式已经在前面介绍过了,下面,我们介绍第二中形式。
4.1 Host启动触发监听事件
大家还记得否,当我们每次调用LifecycleBase的start方法时,都会调用下面这句:
setStateInternal(LifecycleState.STARTED, null, false);
那这句话做了什么工作呢?我们看其源码实现:
LifecycleBase
private synchronized void setStateInternal(LifecycleState state,
        Object data, boolean check) throws LifecycleException {

    ...//检查状态
    this.state = state;
    String lifecycleEvent = state.getLifecycleEvent();
    if (lifecycleEvent != null) {
        fireLifecycleEvent(lifecycleEvent, data);
    }
}

protected void fireLifecycleEvent(String type, Object data) {
    LifecycleEvent event = new LifecycleEvent(this, type, data);
    LifecycleListener interested[] = listeners;
    for (int i = 0; i < interested.length; i++) {
        interested[i].lifecycleEvent(event);
    }
}
我们看到,这里会触犯监听器执行感兴趣的事件。那在StandardHost中有哪些监听器呢?
4.2 创建Host监听
我们要跳到Digester那一块了,大家还记得Digester那块嘛?在Catalina的createStartDigester() 方法中,我们看到下面一句话:
digester.addRuleSet(new HostRuleSet(“Server/Service/Engine/“));
那这句话内部干了什么呢?我们看其实现:
Digester
public void addRuleSet(RuleSet ruleSet) {

    String oldNamespaceURI = getRuleNamespaceURI();
    String newNamespaceURI = ruleSet.getNamespaceURI();

    setRuleNamespaceURI(newNamespaceURI);
    ruleSet.addRuleInstances(this); //我们重点看这句
    setRuleNamespaceURI(oldNamespaceURI);
}

HostRuleSet
public void addRuleInstances(Digester digester) {

    digester.addObjectCreate(prefix + "Host",
                             "org.apache.catalina.core.StandardHost",
                             "className");
    digester.addSetProperties(prefix + "Host");
    digester.addRule(prefix + "Host",
                     new CopyParentClassLoaderRule());

    //这里创建了HostConfig监听器
    digester.addRule(prefix + "Host",
                     new LifecycleListenerRule
                     ("org.apache.catalina.startup.HostConfig",
                      "hostConfigClass"));
    digester.addSetNext(prefix + "Host",
                        "addChild",
                        "org.apache.catalina.Container");

    digester.addCallMethod(prefix + "Host/Alias",
                           "addAlias", 0);

    //Cluster configuration start
    digester.addObjectCreate(prefix + "Host/Cluster",
                             null, // MUST be specified in the element
                             "className");
    digester.addSetProperties(prefix + "Host/Cluster");
    digester.addSetNext(prefix + "Host/Cluster",
                        "setCluster",
                        "org.apache.catalina.Cluster");
    //Cluster configuration end

    digester.addObjectCreate(prefix + "Host/Listener",
                             null, // MUST be specified in the element
                             "className");
    digester.addSetProperties(prefix + "Host/Listener");
    digester.addSetNext(prefix + "Host/Listener",
                        "addLifecycleListener",
                        "org.apache.catalina.LifecycleListener");

    digester.addRuleSet(new RealmRuleSet(prefix + "Host/"));

    digester.addObjectCreate(prefix + "Host/Valve",
                             null, // MUST be specified in the element
                             "className");
    digester.addSetProperties(prefix + "Host/Valve");
    digester.addSetNext(prefix + "Host/Valve",
                        "addValve",
                        "org.apache.catalina.Valve");

}
好,在这里我们看到了HostConfig被添加到监听器里面了。那这个HostConfig干了什么呢?我们接下来继续看。
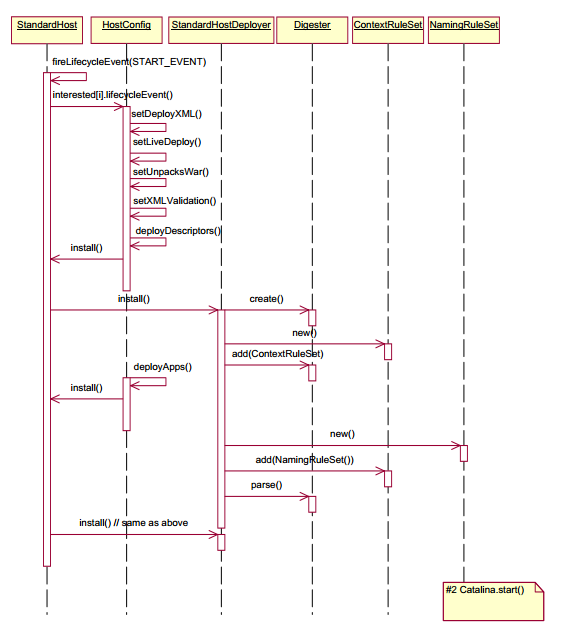
4.3 触发HostConfig调用start方法
我们看他的lifecycleEvent方法实现:
HostConfig
public void lifecycleEvent(LifecycleEvent event) {

    // Identify the host we are associated with
    try {
        host = (Host) event.getLifecycle();
        if (host instanceof StandardHost) {
            setCopyXML(((StandardHost) host).isCopyXML());
            setDeployXML(((StandardHost) host).isDeployXML());
            setUnpackWARs(((StandardHost) host).isUnpackWARs());
            setContextClass(((StandardHost) host).getContextClass());
        }
    } catch (ClassCastException e) {
        log.error(sm.getString("hostConfig.cce", event.getLifecycle()), e);
        return;
    }

    // Process the event that has occurred
    if (event.getType().equals(Lifecycle.PERIODIC_EVENT)) {
        check();
    } else if (event.getType().equals(Lifecycle.START_EVENT)) {
        start();
    } else if (event.getType().equals(Lifecycle.STOP_EVENT)) {
        stop();
    }
}
我们看到,当传递了一个Lifecycle.START_EVENT事件时,调用了HostConfig的start方法,接下来,我们继续看start方法:
HostConfig
public void start() {

    if (log.isDebugEnabled())
        log.debug(sm.getString("hostConfig.start"));

    try {
        ObjectName hostON = host.getObjectName();
        oname = new ObjectName
            (hostON.getDomain() + ":type=Deployer,host=" + host.getName());
        Registry.getRegistry(null, null).registerComponent
            (this, oname, this.getClass().getName());
    } catch (Exception e) {
        log.error(sm.getString("hostConfig.jmx.register", oname), e);
    }

    if (host.getCreateDirs()) {
        File[] dirs = new File[] {host.getAppBaseFile(),host.getConfigBaseFile()};
        for (int i=0; i<dirs.length; i++) {
            if (!dirs[i].mkdirs() && !dirs[i].isDirectory()) {
                log.error(sm.getString("hostConfig.createDirs",dirs[i]));
            }
        }
    }

    if (!host.getAppBaseFile().isDirectory()) {
        log.error(sm.getString("hostConfig.appBase", host.getName(),
                host.getAppBaseFile().getPath()));
        host.setDeployOnStartup(false);
        host.setAutoDeploy(false);
    }

    if (host.getDeployOnStartup())
        deployApps();

}
start方法首先注册自己的mbean中,然后创建了一个目录,最后部署应用。
4.3 部署应用程序
HostConfig的start方法做了很多事,前面的我们都不关心,我们只看deployApps方法:
HostConfig
protected void deployApps() {
    //获取应用路径,即webapps目录
    File appBase = host.getAppBaseFile();
    File configBase = host.getConfigBaseFile();
    String[] filteredAppPaths = filterAppPaths(appBase.list());
    // Deploy XML descriptors from configBase
    deployDescriptors(configBase, configBase.list());
    // Deploy WARs
    deployWARs(appBase, filteredAppPaths);
    // Deploy expanded folders
    deployDirectories(appBase, filteredAppPaths);
}
前面的跟具体功能相关,就不解析了,我们只看最后一段deployDirectories:
    protected void deployDirectories(File appBase, String[] files) {

    if (files == null)
        return;

    ExecutorService es = host.getStartStopExecutor();
    List<Future<?>> results = new ArrayList<>();

    for (int i = 0; i < files.length; i++) {

        if (files[i].equalsIgnoreCase("META-INF"))
            continue;
        if (files[i].equalsIgnoreCase("WEB-INF"))
            continue;
        File dir = new File(appBase, files[i]);
        if (dir.isDirectory()) {
            ContextName cn = new ContextName(files[i], false);

            if (isServiced(cn.getName()) || deploymentExists(cn.getName()))
                continue;

            results.add(es.submit(new DeployDirectory(this, cn, dir)));
        }
    }

    for (Future<?> result : results) {
        try {
            result.get();
        } catch (Exception e) {
            log.error(sm.getString(
                    "hostConfig.deployDir.threaded.error"), e);
        }
    }
}
我们看到,这里获取到了webapps目录下的所有目录,然后使用线程池进行加载每个子目录。
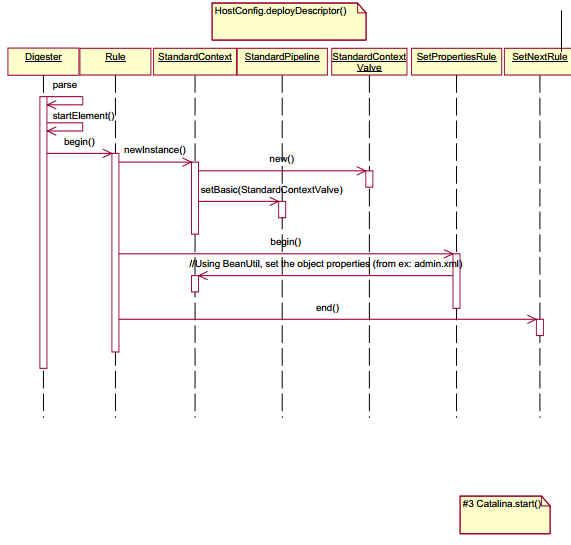
4.4 DeployDirectory内部实现
由于使用的是线程池,我们看它的run方法:
DeployDirectory
public void run() {
    config.deployDirectory(cn, dir);
}
返回来调用了HostConfig的deployDirectory方法,我们继续跟踪:
HostConfig
protected void deployDirectory(ContextName cn, File dir) {

    Context context = null;
    File xml = new File(dir, Constants.ApplicationContextXml);
    File xmlCopy =
            new File(host.getConfigBaseFile(), cn.getBaseName() + ".xml");

    DeployedApplication deployedApp;
    boolean copyThisXml = copyXML;
    //获取web.xml文件,并创建一个Context
    try {
        if (deployXML && xml.exists()) {
            synchronized (digesterLock) {
                try {
                    context = (Context) digester.parse(xml);
                } catch (Exception e) {
                    context = new FailedContext();
                } finally {
                    if (context == null) {
                        context = new FailedContext();
                    }
                    digester.reset();
                }
            }

            ...//略
        }
         ....//略
        //加载ContextConfig并实例化
        Class<?> clazz = Class.forName(host.getConfigClass());
        LifecycleListener listener =
            (LifecycleListener) clazz.newInstance();
        context.addLifecycleListener(listener);

        context.setName(cn.getName());
        context.setPath(cn.getPath());
        context.setWebappVersion(cn.getVersion());
        context.setDocBase(cn.getBaseName());
        //将Context添加到host中。
        host.addChild(context);
    } catch (Throwable t) {
        ExceptionUtils.handleThrowable(t);
        log.error(sm.getString("hostConfig.deployDir.error",
                dir.getAbsolutePath()), t);
    } finally {
        ...//略
}
在这里,我们发现,创建了一个Context,并将其添加到Host中,就完成了未在server.xml中配置Context也可以启动webapps目录下的工程了。好的,container启动部分就到此结束了,下文将介绍connector启动部分。
五,流程图